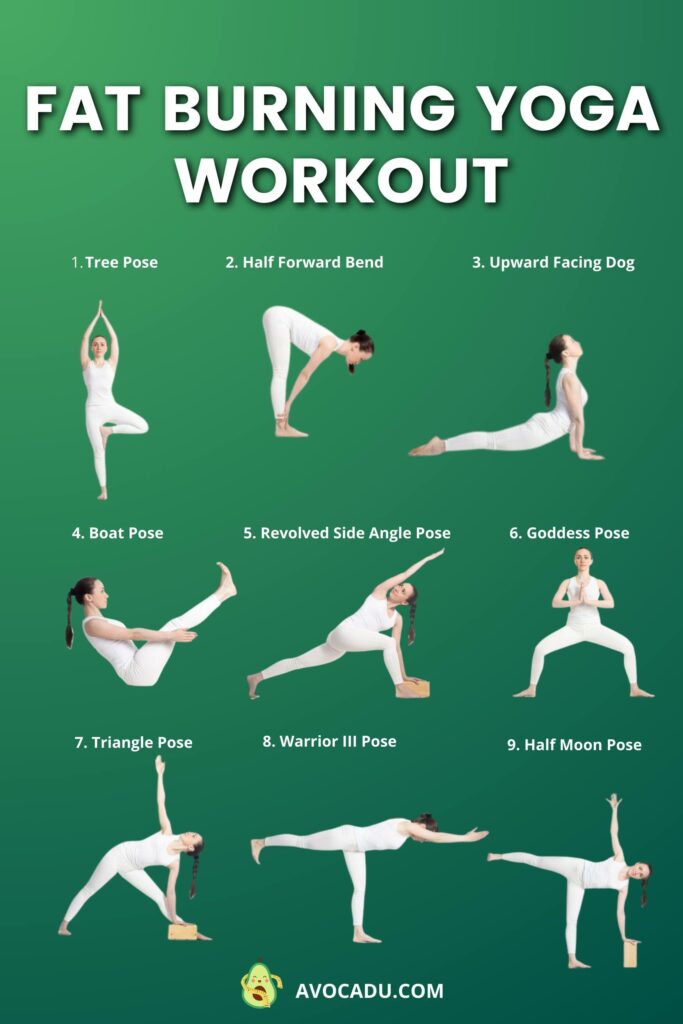
30-Minute Fat Burning Yoga Workout for Beginners
Yoga can truly be an incredible workout, and this 30-minute fat burning yoga workout for beginners can really transform your body if you put your mind to it!
The key is to focus your concentration on your body while you are holding and performing poses. Focus on how they make you feel, and how you can improve.
Focus on what feels “stiff” and what feels like it can be opened up a little more. This is how you will begin to unlock the real potential and capabilities of your body!
Some of these poses are “two-sided,” meaning that you should perform them on both sides of the body (right then left, or vice versa) before moving onto the next pose.
You will want to try to hold each pose for 30 seconds before moving on to the next side or the next pose. If you can’t hold it for a full 30 seconds, take a second to rest, and try again!
After you have completed all of the poses one time through, rest for a minute or two, and then repeat them again! Go for 3 full rounds total, which should be about 30 minutes!
Remember to always breathe deeply through the stretches! Long, deep breaths will help your concentration greatly!
We will start out with a couple of the easier poses, and they will gradually get a little more challenging.
Remember that the challenging poses are the ones that will burn the most calories and help you transform your body the quickest!
P.S. If you’re looking for a full program for beginners with organized workout routines, make sure to check out our Yoga Fat Loss Bible for Beginners.
This post may contain affiliate links, which helps keep this content free. Please read our disclosure for more info.
1. Tree Pose

This pose will test your balance, which is all about your core. During this pose, concentrate on drawing the balance from your core. Tighten your abdominal muscles to help stabilize your body.
For beginners, try performing this pose with your hands pressed together at your heart. When you find your balance, slowly bring them over your head for more of a challenge.
Begin by standing with your feet shoulder-width apart. Slowly bring your left foot up to rest as high up on your right thigh as possible. Keep your hips stacked below your shoulders and your feet.
Hold for 30 seconds, and repeat on the other side before moving on to Half Forward Bend.
2. Half Forward Bend

This pose is great for the hamstrings, back, and hips! In order to actively “work” in this pose, there are a few things to keep in mind.
Focus on bending from your lower back. To do this, draw your navel up towards your spine and essentially “suck in” as you bend forward.
Also, make sure to elongate your torso a bit by arching your back and pushing your butt out. This will create a “straight back” position as you can see in the photo. Your back might still be bent due to flexibility, but it’s something to work on.
If you are doing all of these things correctly, you will feel a strong stretch in your hamstrings.
Hold for 30 seconds before moving onto Upward Facing Dog.
3. Upward Facing Dog

Traditionally, this pose provides a great stretch for the back. While it still will in this workout, we want to focus a little less on the intense stretch in the back because we’re going to hold it for a full 30 seconds.
Lie on your chest with your arms bent and your hands flat on the ground. Slowly push up until your hands are directly below your shoulders. As you do this, lift the knees and hips up off the ground.
The palms of your hands and tops of your feet are the only parts of the body that should be touching the ground.
You can lean back into the shoulders a bit to increase the stretch in the back, but don’t force it too much or you will tire yourself out before the 30 seconds is up. Instead, focus on drawing strength from the core to hold the pose.
Hold for 30 seconds, and then move onto Boat Pose.
4. Boat Pose
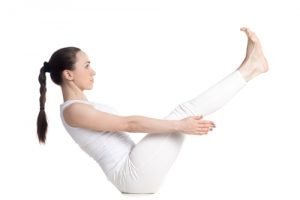
You will soon find out that this pose is great for the abs!
Note that if you find it too challenging, you can also bend the knees. We encourage you to work towards straightening the legs as you continue to practice.
Keep your back as straight as possible, and draw your strength to hold this pose from the core. Try to keep the arms straight and the hands on either side of the knees.
Focus your gaze on your feet or the wall behind you to help you stay balanced.
Hold for 30 seconds.
5. Revolved Side Angle Pose

This yoga pose is great for opening up the hips, and holding the proper form also takes a lot of work from the quadriceps and the abdominal muscles.
Begin in plank pose on your toes with your palms on the floor directly beneath your shoulders. Slowly step your left foot forward as you lift your right hand, and place your foot where your right hand was.
Reach your right hand up over your head to form a straight line with your torso and left leg. If you cannot reach the ground comfortably with your left hand, use a yoga block or other prop.
Lift your gaze upward to increase the stretch. Hold for 30 seconds, and repeat on the other side.
6. Goddess Pose

This is also a great hip opener, and it can be a really intense workout for the quadriceps and glutes as well!
Your feet should be 3 1/2 – 4 feet apart. Slowly sink into the stretch. Work towards getting low enough that your knees are at a 90-degree angle.
Focus on pushing the hips forward to increase the stretch in your hips.
From this position, slowly pulse up and down for 30 seconds. You should feel it in the hips and quadriceps.
7. Triangle Pose

Triangle is great for the hamstrings and the hips. It’s one of those poses that looks easy enough, but getting the proper form requires strength and flexibility.
Step the left foot out about 4 feet from the right. The right foot should be pointed angled forward as pictured, and the left toes should be pointed straight out.
Slowly reach your left hand down to the ground close to your left heel. If you cannot comfortably reach the floor, you can use a yoga block.
The right hand should be pointed towards the ceiling, and let your gaze lift up towards the ceiling as well to increase the stretch. Try to keep your right hip stacked over your left as much as possible (this will require a lot of flexibility in the hamstrings and hips).
Hold for 30 seconds, and repeat on the other side before moving on to Warrior III.
8. Warrior III Pose
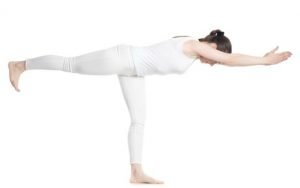
This pose can be quite challenging for a beginner, but give it your best! You may not be able to hold it for a full 30 seconds when you first begin to practice it, but you will slowly improve your form and hold it longer over time!
Raise your arms over your head first for balance, and slowly lift your leg up in the air. At first, you may only get your leg up about halfway. This is okay. Just keep practicing.
This pose requires a LOT of concentration to balance. Focus your gaze on a spot on the floor and hold it while you try to straighten out the body.
Hold this pose for 30 seconds, and repeat it on the other side before moving on to Half Moon Pose.
9. Half Moon Pose
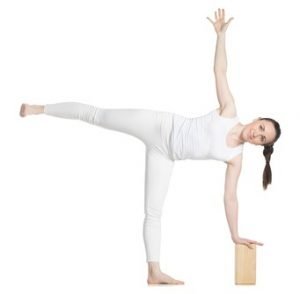
This is another challenging pose, but it will reward your body greatly if you continue to practice it!
Make sure to use a yoga block or other prop if you are having trouble reaching the floor.
From Warrior III (above), keep your leg up and slowly reach your left hand down towards the floor.
You may want to reach both hands down to the floor first to gain your balance. Once you feel balanced enough, slowly reach your right arm up towards the ceiling at the same time that you twist your torso and your right foot out.
This pose also requires a lot of concentration to balance, so focus on a spot on the floor or the wall while you practice. Try to hold it for 30 seconds, and then repeat on the other side.
Remember to rest when needed and after each round of poses. Perform all of them 3x over to complete a full workout!
If you liked these fat-burning poses and are looking for more, check out our Yoga Fat Loss Bible for Beginners!
It’s a great solution for those looking to lose weight, get more flexible, and relieve aches and pains with a calm yoga practice.
It comes with everything you need to get started, including a complete 12-week workout plan, a flexibility guide, and a beginner’s guide to meditation!

It will show you exactly how to melt away stubborn body fat with a regular yoga practice and has the top 50 fat-burning yoga poses every beginner should learn.
Click here to check out the Yoga Fat Loss Bible.
And always remember, the hardest part about yoga is getting yourself on the mat!
Leave a comment below if you enjoyed this article or have any questions!
I bought the ebooks but left the wrong email. Didn’t save or bookmark can you help me and resend to correct email.
How effective will this be for a male :), I would be excited to try 🙂