Yoga Poses for Flexibility, 16 Most Effective Asanas
Looking to improve your flexibility using yoga? In this article, you’ll learn the 16 most effective yoga poses for flexibility!
Flexibility has many health benefits, including healing aches and pains, helping with balance, and injury prevention. Stretching the muscles can also help relieve tension and stress, which can cause all sorts of problems, including weight gain.
These yoga poses for flexibility are broken down into 3 categories: Hamstrings, Hips, and Back
They are also listed in order of difficulty, with the easiest and lightest stretches first. Pick an area to work on, and start from the top!
This is also important because you will increase your flexibility the quickest when the body is properly warmed up first.
In other words, don’t jump right into a 30 second stretch on a really tight muscle. Work your way into stretching the muscle by doing other, lighter stretches first.
Try to hold each pose for at least 30 seconds. Some will need to be repeated on the other side of the body as well.
If you’re looking to take your flexibility to the next level, work up to holding each pose for at least 1 minute.
It’s also a good idea to set certain days of the week to work on certain muscle groups. It can be difficult and overwhelming to try to work on all 3 of these muscle groups every single day. You will likely end up not giving enough attention to any of them.
Try performing the yoga poses for flexibility for each muscle group at least twice per week if you are looking to increase your flexibility fast!
*Note: This article used to have 16 poses. It has since been modified to 15!
This post may contain affiliate links, which helps keep this content free. Please read our disclosure for more info.
Hamstrings
There are a lot of “bends” in these yoga poses for flexibility. They are by far the most effective stretches for increasing flexibility in the hamstrings.
If you begin to get bored practicing them over and over, we suggest you catch up on your favorite TV show to distract you. It’s a great way to get your stretches in and not feel bored or have excuses to skip them!
1. Downward Facing Dog (Adho Mukha Svanasana)
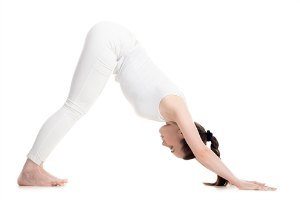
This is a great pose to start with, because it helps to open up the legs, shoulders, and chest before you get into some of the deeper stretches.
The most important part of this pose is keeping the back straight. Try practicing it in front of a mirror, and you will likely notice that your lower back is bending.
As you practice this pose more and increase the flexibility in your legs, ankles, and hamstrings, you will notice that your back will flatten out over time.
Ground your palms into your mat, and bring the head in a little closer to the knees to increase the stretch in your shoulders and chest.
It also helps to “pedal” the feet in this pose, meaning bringing one foot up on the toes at a time while the other is flat on the ground (a pedaling motion).
Hold for 30 seconds.
2. Head-to-Knee Forward Bend (Janu Sirsasana)
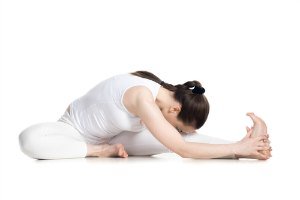
This poses is a very important pose on the list of yoga poses for flexibility.
Depending on your natural flexibility, you may or may not be able to even touch your feet. Don’t worry if you can’t! If you practice these hamstring stretches 2-3 times per week, you will be pleasantly surprised at how quickly that will change!
In any case, reach as far as you can or use a yoga strap until you can reach your toes.
Keep the back straight and flat in this pose, because it will increase the stretch in the hamstrings. Try to avoid hunching over.
Hold for 30 seconds. Repeat on the other side.
3. Seated Forward Bend (Paschimottanasana)
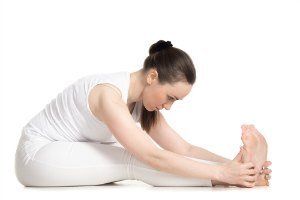
This is the same concept as the pose above except with both feet in front of you.
This can also be done from a standing position, and you should try both after you try the standing half forward bend (farther down this list).
Again, keep the back as straight as possible when you are leaning forward.
It’s more effective to lean forward at the hips rather than at the waist, which leads to hunching over and a lighter stretch.
4. Wide-Angle Seated Forward Bend (Upavistha Konasana)
Spread your legs as wide as you can while still keeping them straight. Place your hands on the ground in front of you, and begin to lean forward at your HIPS, not your waist.
When you lean forward at your waist, you will end up hunching your back. Keep your back as straight as possible.
This will result in you not getting as “far” as you would if your back was hunched but keeping a straight back is the proper form and will be more effective in stretching the muscles to increase flexibility.
This pose can be more effective as an assisted stretch if you have someone that can put a little pressure on your back for you.
Hold for 30 seconds.
5. Standing Half Forward Bend (Ardha Uttanasana)
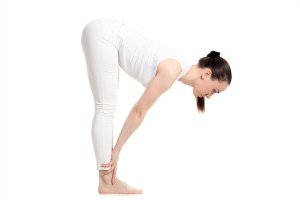
We’re going to start sounding like a broken record, but we cannot stress it enough… Keep your back STRAIGHT while stretching in this pose.
The easiest way to learn this concept in this pose is to practice in front of a mirror.
Start by standing up straight, and slowly lowering down while trying to arch your back and push your butt up towards the ceiling.
At the point where your lower back begins to bend, stop and hold the stretch. For many of you, you will likely not even be able to reach your knees at this point. I know I couldn’t when I first started, but now I can touch the ground!
It’s another incredibly important asana on the list of yoga poses for flexibility.
Practice the proper form, and you will become more flexible and progress faster!
Hold for 30 seconds.
6. Wide-Legged Forward Bend (Prasarita Padottanasana)
Okay, this is the last of the forward bends, we promise. They really are the most effective poses for increasing flexibility in the hamstrings though!
Again, notice how her back is arched and not hunched at all.
Begin with your arms straight out in front of you, and work your way towards the floor when you can do so without bending your back.
Hold for 30 seconds.
Hips
Surprisingly enough, hip flexibility is required for a LOT of poses that you wouldn’t think of in yoga.
That’s why it’s an integral part of the yoga poses for flexibility. Backbends, for instance, require not only flexibility in the back, shoulders, and chest, but also the hips.
They’re also absolutely crucial if you’re interested in doing splits.
These stretches are even more important if you spend most of your time sitting down during the day, which tightens the hip muscles. Practice these 2-3x per week when possible.
7. Bound Angle Pose (Baddha Konasana)

Bring the bottoms of your feet together in front of you, and clasp them with your hands.
Keep your back straight, and bend forward at the hips, not the waist.
Your knees likely won’t touch the ground, but the goal is to eventually have them on the ground.
Spend a little time leaning forward like pictured above and some time pressing the knees lightly into the ground as you bend forward.
Hold for 30 seconds.
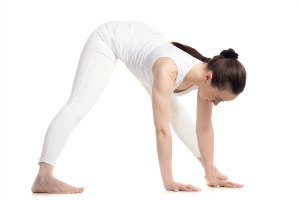
8. Lunge (Anjaneyasana)
You’ve likely done a lunge as part of an exercise program before, but it’s entirely different in yoga. We aren’t trying to work the glute muscles. We’re trying to open the hips.
You generally want to keep the front leg at a 90-degree angle, but it’s also good to move a little in this stretch. It will help to work different areas of the hips. You can lean forward a bit like pictured above, or you can also raise your arms straight above your head and even backward a little bit to stretch the back.
The top of your back foot is traditionally flat on the floor, but you can try this variation as well.
This stretch is vital to being able to do the splits. It stretches the inner muscles of the hip.
Hold for 30 seconds, and make sure to repeat on the other side.
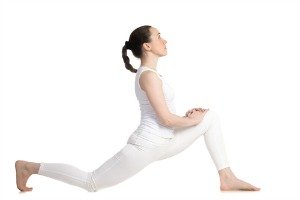
9. Pigeon Pose (Kapotasana)

This pose stretches the outer hip muscles. There are two variations of this stretch.
First, try it as pictured above. The left leg should be at a 90-degree angle, but beginners will need to start out with it closer to the body. Your right leg should be straight out behind you.
Press up through your hands to keep your shoulders back to stretch the lower back as well (you can also hold yourself up using a table or wall). You will likely feel it in the front of your right hip as well.
For the second variation, keep the legs in the same position as the first but bring your chest all the way to the floor (or as close as you can – this may mean leaning on your forearms for some). This will take the stretch out of the back and even more into the outer left hip.
Try holding both variations for 30 seconds each before moving on to the other side of the body.
10. Goddess Pose (Utkata Konasana)
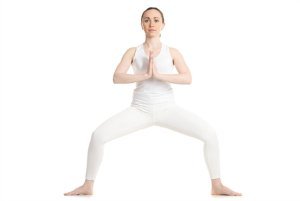
Ahh… The yogi squat… Although the purpose of this type of squat is a little different. This is a multipurpose pose.
Your legs should be about 4 feet apart with the toes pointed outward. Your hands can be together at your heart, straight out to the sides, or perched on your hips.
This pose is a great hip opener. Press your tailbone forward and try to imagine that your butt is in line with the knees. Obviously, it is several inches behind it, but this will help you think about bringing the tailbone forward and stretching the hips.
The other option in this pose is to get into and do small “pulses” up and down that will work the butt muscles.
Try to work towards getting your legs as close to a 90-degree angle as possible with your thighs parallel to the ground.
Hold for 30 seconds and/or pulse for 30 seconds for an extra workout.
Back
These next few yoga poses for flexibility will likely help you if you suffer from chronic aches and pains in the back.
That being said, if you have any back problems, please consult a doctor before you try any of these.
The spine is very delicate, and damage to it can be very serious. The poses are listed in order of difficulty, so stop and rest when you need to before moving on.
11. Cobra Pose (Bhujangasana)
This is one of those poses that can be really “easy” if you don’t work properly in it. Make sure that you are challenging yourself to feel the stretch if you want to get anything out of it.
The goal is NOT actually to straighten your arms in this pose. That can damage your back if you aren’t careful. Your legs, hips, and even lower ribs should all remain on the ground.
Place your arms in front of you with your elbows bent, and slowly rise up using your shoulders and upper back.
Press down on the floor with your hands, but try to focus on lifting with your chest and upper back rather than letting your hands do all the work. You will feel this stretch greatly in your lower back.
This is a great pose to warm up the back for some of the more intense stretches.
12. Upward Facing Dog (Urdhva Mukha Svanasana)
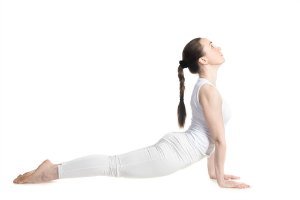
This pose is another key poses in the yoga poses for flexibility and is very similar to cobra pose (above) with a couple of key differences.
The first one is that the arms are completely straight in this pose. The second is that the hips and knees are actually not touching the ground.
This allows for a deeper stretch in the back, but the legs being lifted also helps protect the back from injury.
The palms of the hands and the tops of the feet are the only parts of your body that should be touching the floor.
Lift your gaze upward, and hold for 30 seconds or as long as you feel comfortable.
13. Bow Pose (Dhanurasana)
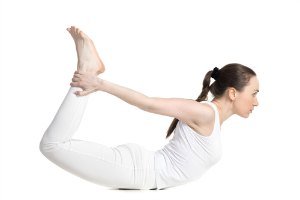
This one may feel a little awkward if it’s your first time trying it. You’ll probably look a little more like a squashed bug until you’re flexible enough to get a little higher in this pose 🙂
Grab the outside of your ankles with your hands, and lift your chest up at the same time as you lift your legs up in the air. It may take a little adjusting to get into a slightly comfortable position.
If you feel too much pressure or any pain in the knees, take a break and try it again.
Only hold this one for 5-6 breaths unless you feel comfortable enough to hold it for longer.
14. Camel Pose (Ustrasana)
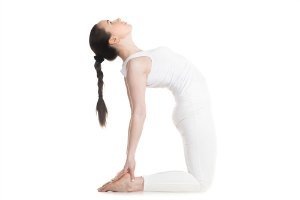
This is my personal favorite to really get my back even more warmed up when I’m working on my backbends.
Before you try this, you should first place your hands on the back of your hips, lift your gaze up, and lean back that way.
If you feel comfortable enough, lean back slightly and shift your weight to one side to grab one heel (for me, it’s always my right) with one hand. Then arch your back a bit, lean back a little further, tilt your gaze up a little higher, and reach back to grab the other heel.
Let your neck rest back and make sure that you aren’t straining to try to keep it upright. This could cause injury.
Start out holding this pose for 5-6 breaths until you feel comfortable enough to hold it longer. You can also try lifting one arm straight back behind you at a time to increase the stretch in one side of the back at a time.
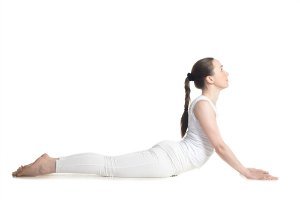
15. King Cobra Pose (Bhujangasana)
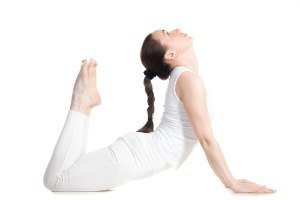
So in the full form of king cobra pose, your feet are meant to touch the top of your head. Obviously, this requires a LOT of flexibility.
We added the pose in the yoga poses for flexibility, because it’s still a really great stretch whether you can touch your head or like me, you’re nowhere near touching your head 🙂
You’ll want to start out in cobra pose (above), and lift your toes up towards your head at the same time that you’re arching your back and leaning backward.
Beware of the position of the knees. They have a tendency to want to stick outwards, so try to keep them as close to hip-width as possible.
This pose will probably take some adjusting, and you should only hold it for as long as you feel comfortable.
Remember to always listen to your body first and foremost when working on your flexibility, especially when it comes to your spine.
If you push yourself too hard, you will injure yourself and hinder any progress that you have made. That being said, you still want to apply enough pressure to stretch the muscles.
When you feel the stretch “ease off” a bit, try to reach just a little farther. Also make sure to rest when you need to!
If you liked the 15 poses for flexibility and are ready to be DONE with feeling stiff and tight in your body, check out our Yoga Fat Loss Bible for Beginners!
It can be a little overwhelming and very frustrating to get the process started, stay motivated, and stay on the right track.
I know that when I started, I was trying to work on everything at once. There were so many poses with so many different benefits. I ended up getting barely better at everything rather than much better at my goals.
This is why I created a Flexibility Guide as part of my Yoga Fat Loss Bible for Beginners.
The Yoga Bible itself has 50-fat burning yoga poses with pictures and full instructions that are aimed at all of the most common areas of yoga: strength, balance, flexibility, and meditation.

The Flexibility Guide was created for the number 1 goal of increasing flexibility. I wrote it from the standpoint of my own practice and what has worked the most for me over the past several months.
It is all-encompassing, with the most effective stretches and yoga poses for every muscle group that you want to target. It also includes beginner modifications and other tips and tricks that I have discovered along the way.
Good luck in your journey, and please leave any comments or questions you may have below! I’d love to hear from you!
can i really practice yoga on my own? it is not really a popular art here in Nigeria but i have as a writer written so much about this stuff and i think am really missing out in the benefits
Are there any poses that will help you be able to do splits faster?